![]()
How the weather station began
| My interest in the weather began many years ago with a fascination with the temperature, I liked extremes.My fathers greenhouse max/min thermometer didn't stay in the greenhouse very long. I was always looking at the temperature. On holidays I would always be able to identify where all the thermometers were. In the past few years I recorded daily maximum and minimum temperatures on the kitchen calendar, including the prevailing weather. |
| These early readings were taken using an RS digital Max/min thermometer read every morning. A 3 metre lead allowed the temperature bulb to be placed on a North Facing wall. It was very reliable and handy to read the outside temperatures from the house. Th readings began to fail as -40c and LLL were indicated on warm sunny days. The unit required replacement. |
|
 |
The replacement was an Oregon Scientific Cable free Thermometer. Again the transmitter was mounted on the North facing wall. As my interest in accuracy grew I realised that this North facing wall was giving errors, readings that were not falling to what I expected during the night and probably not giving a true daytime temperature. Various books and references on the internet suggested the answer. |
| I needed a screen a Stevenson screen....., but the price......! Something cheaper....... thats it I will make my own. Several hours in the garage and hey presto a home made screen well it looked a little like a screen. It consisted of several plastic cartons about 12" * 5" cut to a depth of 1-1.5" and because they sloped slightly they fitted together (with a little glue and some cable ties). Air could flow through the sensor was sheltered from direct sunlight. It worked, the only thing was that stuck in the middle of the garden at 4' above the grass it did look a little unsightly. As my interest grew I began looking for something a little more sophisticated. Visits and questions to Uk.sci.weather newsgroup provided me with a potential answer a Davis Weather Monitor. It measured well....everything, and was what I wanted, the price was reasonable. |
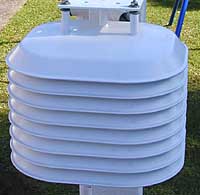
| With that in mind I began to save up and couldnt resist starting my weather station off with a the Davis Gill screen, my existing transmitter would fit inside until I could afford to purchase the complete Davis Weather Station. |
 |
| I also constructed a simple rain gauge using the old Blue Peter principle,an empty lemonade bottle with the top cut off and turned around forming a funnel. Inside the base was a narrow empty bottle (Worcestershire Sauce I think).Calibration was simply a case of measuring 10mm in the large bottle emptying it into the smaller and marking the side. It was quite easy to get values of 0.5mm in this way. Not very accurate I know but I could look at comparisons between different days of rainfall |
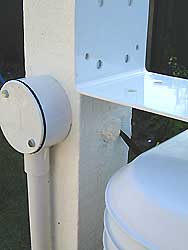
| Having decided where my sensors were to be fitted I purchased some 15mm plastic conduit and excavated the garden from the house to the location for the rain gauge and again to the Gill screen. A 3" square wooden post allowed the Gill screen to be securely fixed along with the conduit up the side of the post to a conduit box. I drilled The wood and pushed through some conduit for the cable. A 25mm conduit ran through the garage to keep all the cables neat, after all I had to keep the wife happy. |
 |
| In late May 2000 I had saved enought to purchase a Davis Complete Weather Station. My cheque was sent to Prodata, and just over a week later (Tuesday 13th June) my parcel arrived. |
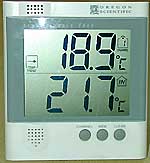
| As all the sensor sites had been provided with conduit runs from the house, the installation was simple. All I needed was some help pulling the cables in.The temperature Humidity sensor was the easiest to sort out and it was up and running late on Wednesday 14th June. The display on the console inside now displaying a temperature reading. | 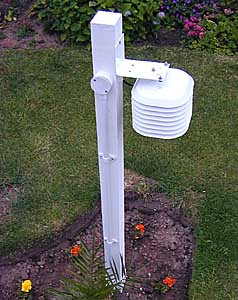 |
| Thursday 15th June I tackled the annemometer. I had fixed the brackets for the annemometer several days before. What a task perched on the top of a ladder at the apex with a power drill. The 3m mast would give me a 1.6 metre clearance from the ridge. As the hard work was done the annemometer only took 90 minutes to install. The unit was aligned with true North and away she went. | 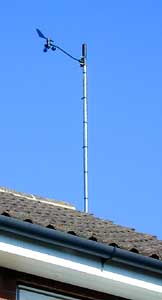 |
| For the Raingauge I had bought a small 12" square paving slab drilled the bottom with a 20mm hole and four fixing holes for the rain gauge. A small foundation with a mortar mix allowed the paving slab to be lowered onto the conduit and bedded down with a spirit level. The next day (Saturday 17th June) I screwed down the base and pulled the sensor cable in. Connected her up and tipped the bucket, 0.2mm registering on the display, another success. Installing in this way completely hid the connecting cable. | 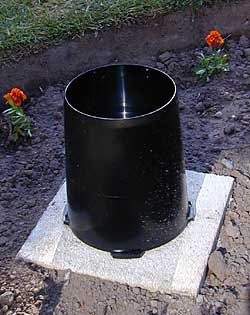 |
| Ultimately I knew that to maintain readings when on holidays I would require a Weatherlink Datalogger. More money! Well birthday approaching I could see a way of purchasing one. The 1st August and I now have my Weatherlink. The unit unit connects between the Davis weather console and the computer. I have set the datalogger to sample every 8 seconds and provide the average of those values every 15 minutes. At this rate the logger will store 15 days worth of readings enough to cover a two week holiday. |
If you have any comments or questions please e-mail me.